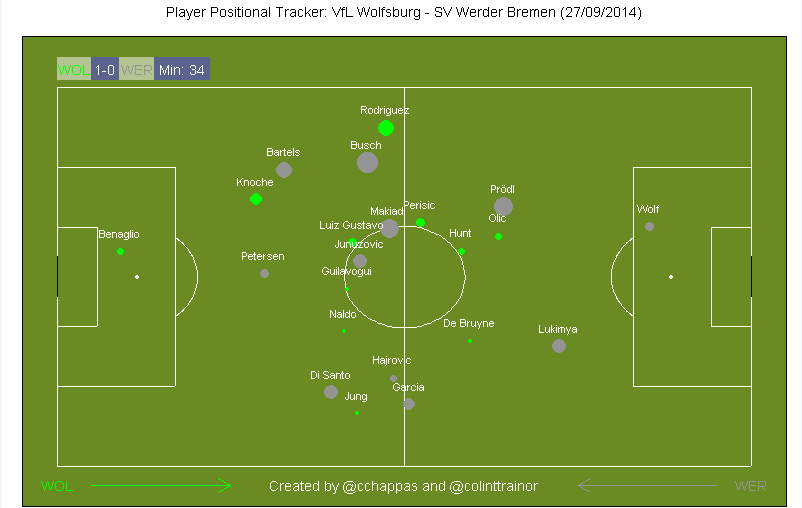
Wolfsburg 2 vs 1 Werder Bremen Continuing the theme of insightful analysis from guests, I aked the brilliant Rene Maric if he could provide some analysis on a German match of his choice from the weekend's Bundesliga round. For those who are not aware of Rene, he is one of the brains behind the excellent Spielverlagerung tactics site, think of the German equivalent of Zonal Marking's Michael Cox. That's Rene. Unfortunately I was having technical issues with the data for Koln v Bayern Munich game so Rene was kind enough to offer to analyse the Wolfsburg v Werder Bremen game instead, via the use of our Player Positional Tracker. Rene's comments and analysis appear below the gif, and as always click on the image to open it in a larger window.  In the game Wolfsburg vs Werder Bremen the international audience probably saw two rather unknown coaches who are both considered one of the most competent tactically in Germany. Wolfsburg's Dieter Hecking is the 'classical' hard working coach who survived relegation battle regularly at Nuremberg and Hannover; he defines himself through solid attacking play and intelligent adaptation for specific games. Mostly he mixes man-marking with zonal marking or implements intelligent tactical changes like a 4-1-3-1-1 against Louis van Gaal's Bayern in 2010/11. Robin Dutt is the opposite: He often has really interest and sometimes extreme ideas with mixed success - at Freiburg he was great, he failed at Leverkusen (though more because of man-management aspects) and now at Werder he is mediocre. Against Wolfsburg Dutt had another rather unusual idea to create an advantage for his side. As you can see in the PPT, often Junuzovic is much higher than Makiadi and both wingers are not really wide. This was because when pressing higher Junuzovic moved upfront and created a diamond; the wingers then went more towards the middle and the shape was a 4-1-2-1-2/4-3-1-2/4-1-3-2. But as soon as the high press was beaten, Junuzovic came back and the wingers played classic against. This was then a typical 4-4-2 formation in their own half in pressing. Probably the goal was to close down Wolfsburg's passing options in the first third of the pitch and then attack them aggressively; if it wasn't possible, they dropped back to a more stable shape. Interesting was the focus on the right side. As you can see both Bartels and Busch on this side were pushing high; Busch was also very involved into the attacking play, while Di Santo and Petersen moved very much but tried to stay near each other for fast combination play and flick ons. At Wolfsburg's PPT it is easy to see that they had a rather clear 4-2-3-1, where both wingers tried to come into the middle and Olic was moving very much accross the horizontal to open space. Especially de Bruyne was going towards the middle, where Hunt had more of a balancing and supporting role - he wasn't involved as much as a normal 10 could have been. Interesting is also the higher focus on Gustavo and his deeper role. In the beginning Gustavo often went towards the left half space to be able to get free, pass towards Rodriguez and cover behind him. Later Gustavo was often standing inbetween or infront the two centrebacks, while Guilavogui was the one advancing from centre midfield. Against the ball Guilavogui also had a higher and more aggressive role, sometimes he helped Hunt or took over Hunt's position who then advanced upfront to support Olic. This was also because of situative man-marking from Guilavogui towards the oppositional centre midfielders; a classical Hecking approach. Involvement in general according to the PPT was rather focussed on the wing and some individual players; the wingers were rarely near the touchline at both teams while the wingbacks pushed upfront very much. Vierinha/Jung as right backs did it nearly in such a manner as Rodriguez on the left and for Bremen it was their right back Busch who did it very often in the first half, but then stayed more passive in the second half. Interesting that at the PPT it even often looked like a 4-3-3 or even a lopsided 3-4-3 for Bremen, while in fact it was "just" more a focus on the right side and Bartels pushing high up as was Busch. Hajrovic in these situations came towards the middle to fill the space and support the strikers or give connections to other zones, while at Wolfsburg it was evident that Perisic and de Bruyne had with some positional changes within the game. The general scheme of this game in the second half seemed Wolfsburg's shape became more open as they played with more of the ball while Werder on the other hand had to defend more and they were more compact; which is best seen with the less advancing of Junuzovic and Busch.
Author: Antonio
Player Positional Tracker: Chelsea v Aston Villa
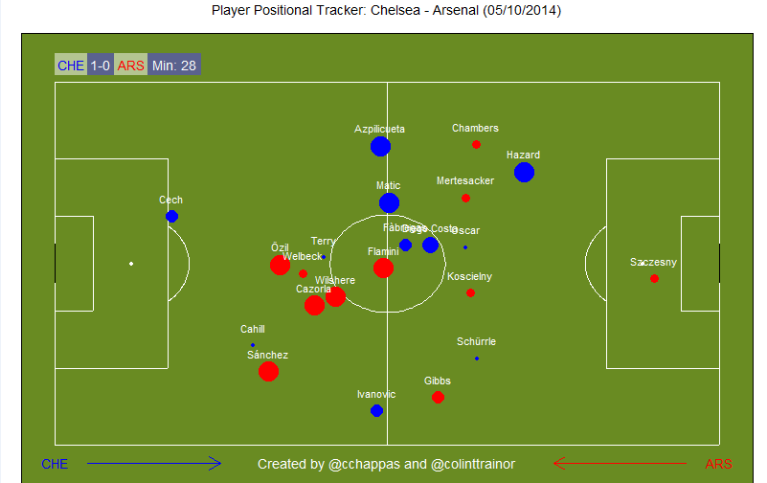
Chelsea 3 vs 0 Aston Villa The comments on this game are from Adam Clark, a writer for SB Nation's Aston Villa site, 7500toHolte. Adam's comments appear below the game visualisation. (Click on the image to open in a larger window) 
Chelsea -
- A masterclass on how to overwhelm a side defending deep and narrow. Matic and Fabregas set up an incredibly stable double-pivot inside the Villa half, always sticking close together. Matic barely moves into his own half until the 60th minute when Chelsea's second goal marked a shift to a more defensive shape. Villa's midfield never managed to dislodge the two, who simply switched positions in response to one of the pair being pressed.
- Ivanovic's effectiveness on the right flank released Willian to play a free role across the forward line, switching flanks with Hazard freely while being an attacking threat on his own right as he ventured forward to play crosses into the box.
- Diego Costa won the battle against Villa's centre-backs who never managed to force him beyond the width of the box. He formed a hugely effective point of a triangle with any two of Oscar, Hazard and Willan.
- Chelsea are an incredibly balanced side, with threats down both flanks and through the middle with Fabregas
Aston Villa
- In contrast to Chelsea's fixed centre, Villa's midfield trio of Cleverley, Delph and Weimann never settled into a shape with one of them in front of the back four. Westwood occasionally settles into the spot but at other times goes tracking the Chelsea midfield. Their initial compactness fell apart as Delph drifted frustratedly out to the left in the second-half.
- Weimann and Richardson cannot be faulted for their work rates in covering their full backs, covering a huge amount of ground up and down the flanks, but never successfully connected with the midfield trio to close down the space inside or isolate the Chelsea full-backs.
- Baker and Senderos very rarely moved as a co-ordinated pair to one flank or the other, with their movement principally vertical as they looked to win aerial duels. Both the first and second Chelsea goals saw the two fail to cover one another. For the first, Senderos looked to defend the goal-line rather than cover the space as Baker went to challenge. For the second Baker failed to cover the space behind Senderos as Costa ran in for the header.
Player Positional Tracker: Crystal Palace v Leicester
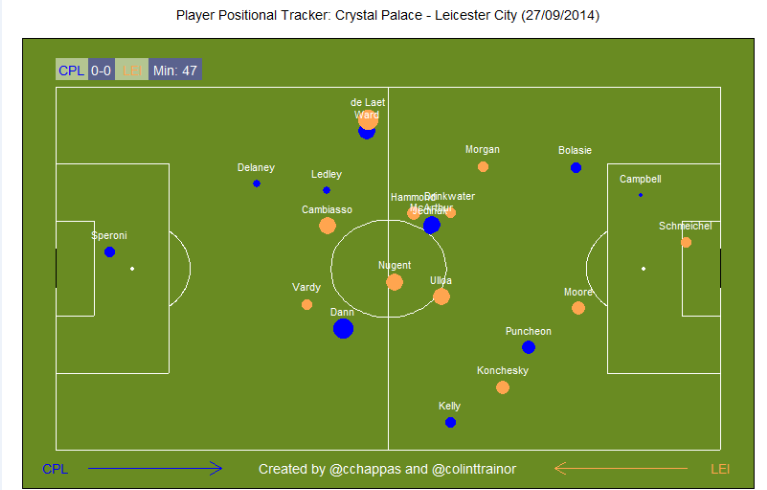
Crystal Palace 2 vs 0 Leicester Comments on this PPT have been made by Crystal Palace fan, Jamie Seekings. Jamie's thoughts appear below the gif. (Click on the image to open in larger window) 
- Palace set up in the published 4-2-3-1 with Yannick Bolassie, influential in Palace's last week's win at Everton, having a quiet first 20/25 minutes before becoming more of an inside forward than a winger for the rest of the match (although his most influential moments came from picking the ball up in wide positions).
- Similarly Jason Puncheon on the right flank plays the other inside forward channel right from the off. In fact, except for a small period of time (65 to 75 minutes) he's never near his wing and for the last ten minutes both end up in what you would call traditional centre forward positions within a 4-4-2. His positioning seems to effect Paul Konchesky who never manages to get forward as much as Ritchie de Laet does on the other side (either de Laet or Palace going two up means Joel Ward similarly doesn't get forward much in the second half compared to the first 25 minutes).
- Up front Frazier Campbell for his 73 minutes takes up a variety of positions, clearly trying to link up play as the lone front man. From Palace's midfield Joe Ledley was the most forward of the three trying to support attacks.
- Leicester begin the game with Vardy, Ulloa and Nugent taking up positions more akin to a 4-3-3 (which is representative of their early pressure which led to Jamie Vardy's chance after 6 minutes). After their initial pressure, Ulloa and Nugent both end up playing much deeper - what you would consider more of a central midfield position. Vardy, impressive on the right hand side against Man Utd last week, spends the first 5 minutes there before coming into a more centre forward role before settling in the left hand forward channel.
- For Leicester Esteban Cambiasso is the midfield player most looking to support the front three and is very advanced in the first part of the first half. He then roams all over midfield in an attempt to spark the Foxes before his substitution on 64 minutes.
Player Positional Tracker: Liverpool v Everton
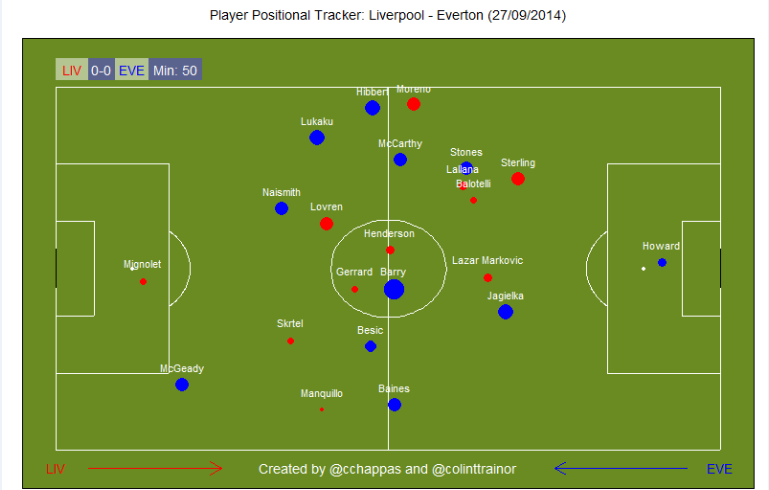
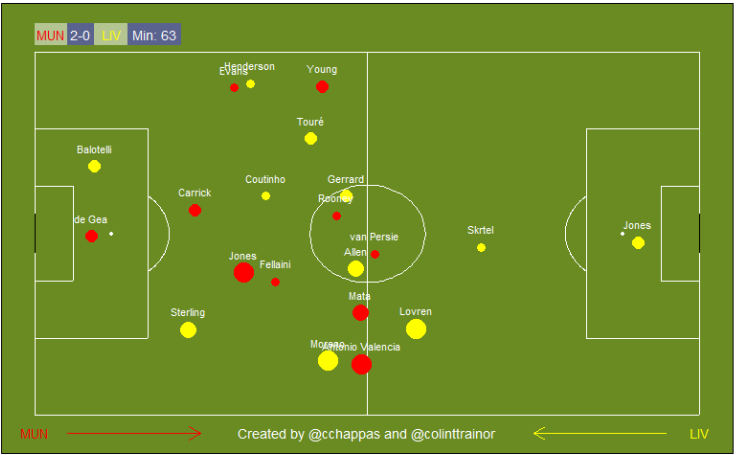
Liverpool 1 vs 1 Everton This was the game that Steven Gerrard comprehensively answered his critics, or so the narrative goes. As I pointed out on Twitter, I hadn't heard too many people criticizing Gerrard in relation to his free kick execution. Sometimes the narrative stinks. Anyway, on to the shape of the game, and our thoughts appear below the gif........ (Click on gif to open in larger window) 
- Once again, Moreno took up some super attacking positions. For the first 30 minutes he is shown as being higher up the pitch on this PPT than Lallana
- Liverpool very much favoured attacking the left wing, pretty much to the exclusion of the right side. Sterling, Moreno, Lallana and even Balotelli all drifted over to the left side. Conversel, only Markovic (occasionally) and Manquillo offered attacking options down the right
- Naismith kept himself very high and central. Presumably this was Everton's version of the now-standard "stick someone on top of Gerrard" tactic. Did this Naismith position push Lukaku into a wider right spot? Lukaku certainly favours the right channel, but is his best position really as wide as this?
Some comments from Elston Gunn, a Liverpool fan:
- Gerrard and Henderson played as a clear duo in midfield and remained close to each other for most of the game, without an obvious sitter/runner distinction between them.
- As Everton have done more and more in big games, Naismith played in a clear "false 9" role with Lukaku on the right.
- Everton looked to attack down the wings, presumably hoping to exploit the aggressiveness of Liverpool's fullbacks and Lukaku's height advantage over Moreno. Lukaku and Mirallas/McGeady are often the most advanced and most involved Everton attackers.
- McGeady seemed to stick tighter to the left-hand side than Mirallas, who had shown fluidity in his 30 minutes on the pitch.
- Manquillo was much more reserved than Moreno for the first half hour, perhaps concerned about Mirallas' threat in behind, but (after Gerrard could be seen telling him to get forward) he became more ambitious as the game went on.
- Baines was able to get forward and get on the ball early on but then was pinned back, especially after Markovic (whose dot is almost always miniscule, struggling to get involved) was removed
- Sterling was consistently Liverpool's most involved attacker, predominantly playing to the left today, swapping spots with Lallana from the setup against Middlesbrough. This was partially related to the proverbial game of chicken happening down the Liverpool left/Everton right. Lukaku was staying advanced, and Moreno continued to push forward. Particularly toward the end of the first half and early in the second, you can see both teams looking to attack down the same side. To some degree, Liverpool solved this problem by treating Lukaku as a striker rather than a wide forward, with Lovren often staying close to him.
- Coutinho was able to get on the ball and try to dictate the play when he came on.
- The American commentators talked about Browning as a defensive sub to protect against Sterling, but he was more likely brought on to attack more aggressively down the right. Liverpool were of course sitting deeper at this point, but he was more advanced and more involved than Hibbert had been down that side.
Player Positional Tracker: Man United v West Ham
Man United 2 vs 1 West Ham Comments / analysis on this PPT are from Sam Gregory. They are shown below the gif. (Click on image to open in a larger window) 
1st Half
- Rafael started the match really strongly, with quite a few runs down the right, one of which led to Rooney’s opener.
- Rooney and Falcao both played pretty centrally in a formation that looked much more like a 4-3-3 than the diamond midfield of United’s last few games. Robin Van Persie was isolated out on the right hand side of the pitch almost the entire match without being too involved in the play aside from his goal.
- Downing started the match in a very advanced role for West Ham, but started to drop more deeply into the midfield as the half progressed and saw much more of the ball, giving Enner Valencia and Sakho more space up front.
- With Di Maria having a bit of an off game Herrera was more involved than he had been in previous matches, playing centrally despite his starting position as the right sided midfielder.
2nd Half
- Compared to the first half where Rooney was very involved, for the fifteen minutes he was on the pitch during the second half he was completely anonymous and saw very little of the ball. Then he had his moment of stupidity taking the red card which changed the complexion of the match.
- After the red card West Ham’s attack became much more fluid. The key change appeared to be Jenkinson coming on for Demel who hadn’t had much of an attacking presence all match. Jenkinson played much further forward and had a lot of the ball while making runs down the right hand side of the pitch.
- Manchester United’s introduction of Antonio Valencia really shut the game down in the last five or ten minutes as he held the ball up on the right side of the pitch killing the clock.
Conclusions
- West Ham showed glimpses of their performance from last week against Liverpool, but unlike against Liverpool when their chances came on the fast break, United were in a shell for the final 30 minutes which didn’t give the Hammers the same opportunity to attack at pace.
- Louis Van Gaal moved Rooney further up the pitch in an attempt to transition from a diamond midfield to a 4-3-3 in this match. The change seemed to isolate Van Persie, but given Rooney’s inevitable suspension this isn’t a formation we are likely to see again from United for at least the next three matches.
Player Positional Tracker: Newcastle v Hull
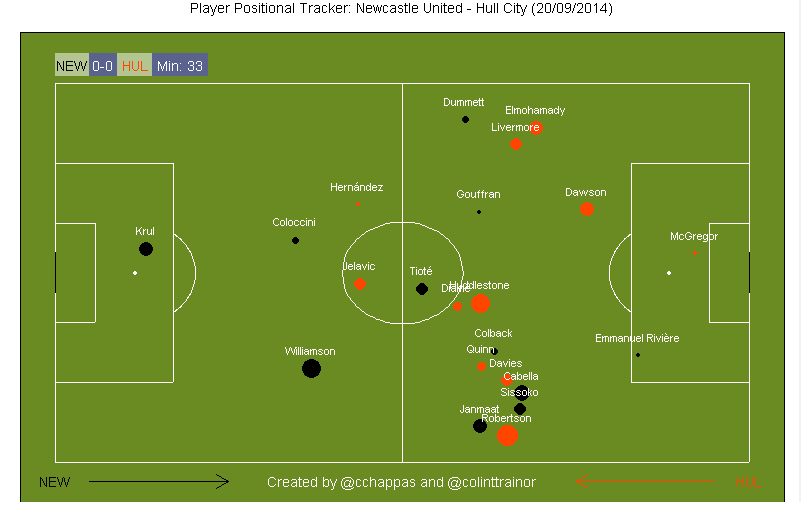
Newcastle 2 vs 2 Hull Visualisation that shows the smoothed positions of players around the time as indicated. The locations are identified with reference to actions as identified by Opta.
- Despite lining up with a supposed Back 4, Newcastle played the opening half as if with a Back 3 as Coloccini held the central position and Williamson played very wide towards the right wing
Additional comments from Zubair Arshad:
- confirms tiote's positioning which Anita has been unable to offer in earlier games.
- portrays very well how the space was congested on right due to Cabella + Sissoko, with all the space on left
- the space wasn't fully exploited by Dummet on left as he's not a very attacking full back
- in build up play it was very much a "W" formation at the back with neither fullback bombing forward recklessley
- quite funny to see Krul's positioning change towards second half as he got involved in recycling process
(Click the image to open in larger window) 
Player Positional Tracker: Aston Villa v Arsenal
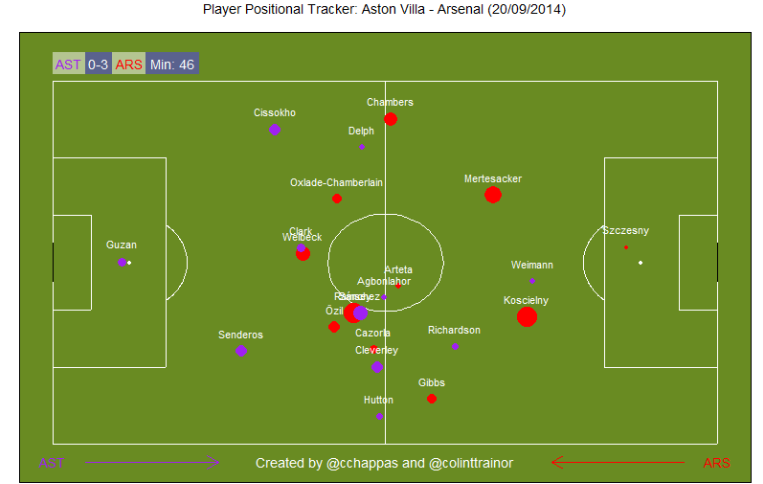
Aston Villa 0 vs 3 Arsenal Visualisation that shows the smoothed positions of players around the time as indicated. The locations are identified with reference to actions as seen through the eyes of Opta.
- Cazorla and Welbeck occupied quite similar positions throughout the game
- Although named centrally, Ozil still found himself drifting towards Arsenal's left wing as Cazorla and Ramsey occupied a lot of the central attacking space. Ramsey dropped deeper during the second half as the game fizzled out
(Click the image to open in larger window) 
Player Positional Tracker: Everton v Crystal Palace
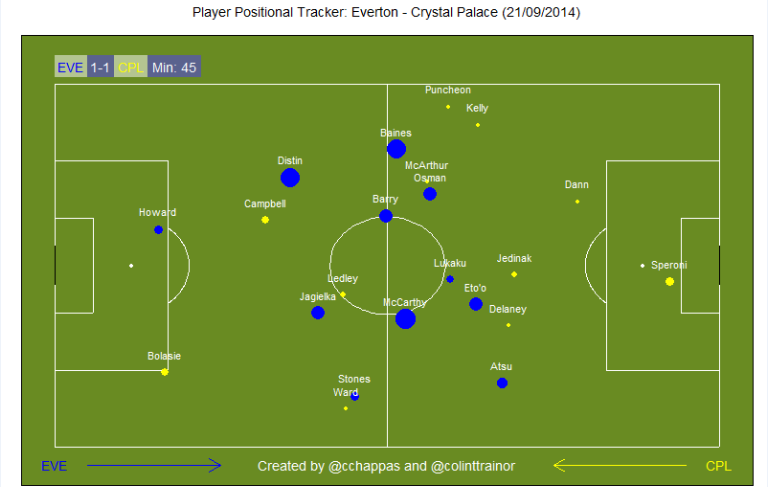
Everton 2 vs 3 Crystal Palace Visualisation that shows the smoothed positions of players around the time as indicated. The locations are identified with reference to actions as seen through the eyes of Opta. (Click the image to open in larger window) 
Player Positional Tracker: Leicester v Man United
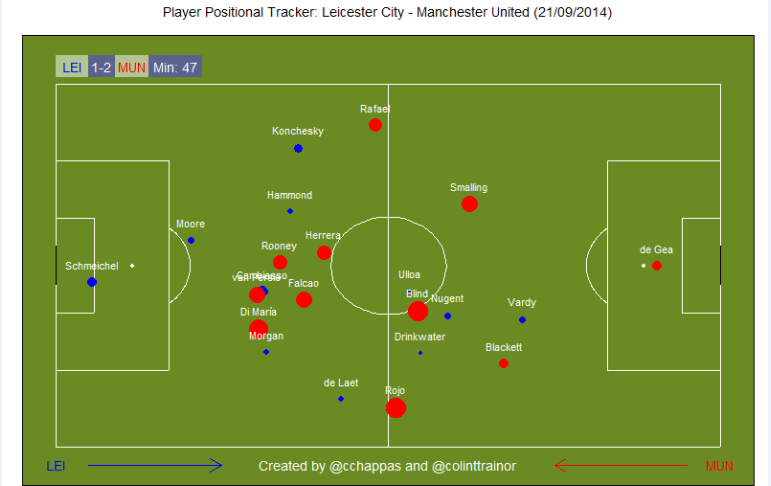
Leicester 5 v 3 Man United Visualisation that shows the smoothed positions of players around the time as indicated. The locations are identified with reference to actions as seen through the eyes of Opta.
- Leicester's bold attacking move with playing 3 up front was rewarded as the home team managed to win all 3 points
- Another game rolls by in which van Persie didn't really play a major part. His dot remained incredibly small during large parts of the match. Has the time come for LvG to bite the bullet and drop his Dutch comrade? This may be preferred instead of trying to crowbar the triumvirate of RvP, Rooney and Falcao into the same attacking formation
(Click the image to open in larger window) 
Player Positional Tracker: Man City v Chelsea
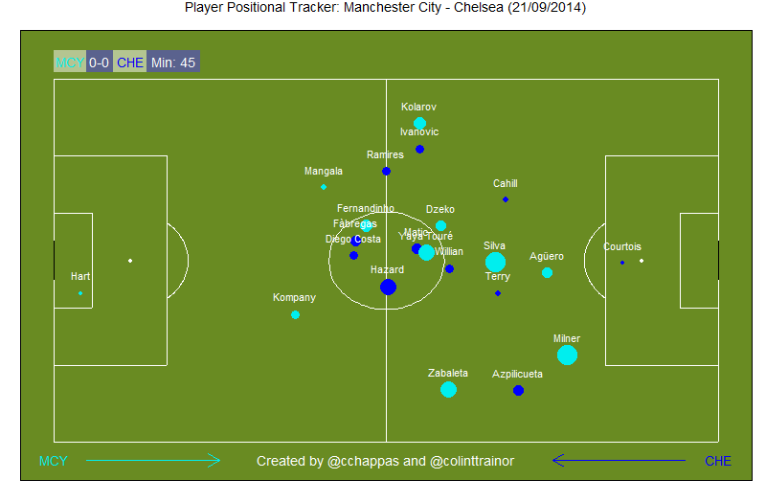
Man City 1 vs 1 Chelsea Visualisation that shows the smoothed positions of players around the time as indicated. The locations are identified with reference to actions as seen through the eyes of Opta.
- As remarked by Danny Pugsley, Yaya Toure played in a very disciplined role right throughout the game
(Click the image to open in larger window) 
Player Positional Tracker: Tottenham v West Brom
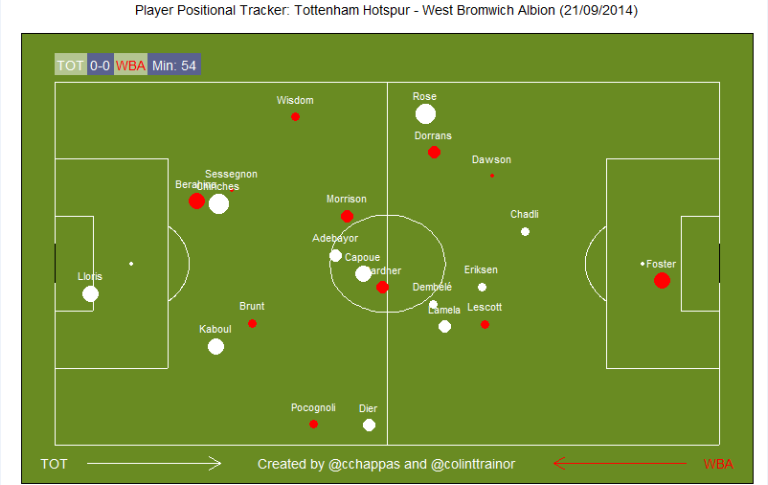
Tottenham 0 vs 1 West Brom Visualisation that shows the smoothed positions of players around the time as indicated. The locations are identified with reference to actions as seen through the eyes of Opta. (Click the image to open in larger window) 
Player Positional Tracker: West Ham v Liverpool
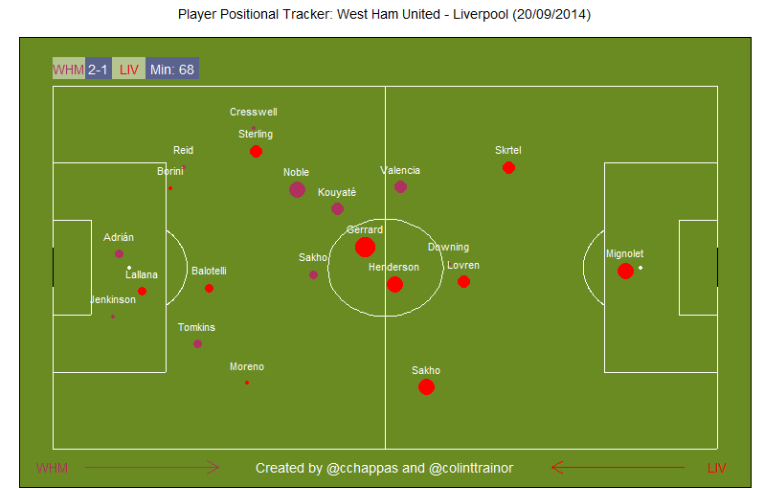
West Ham 3 vs 1 Liverpool Visualisation that shows the smoothed positions of players around the time as indicated. The locations are identified with reference to actions as seen through the eyes of Opta.
- It is noticeable that Downing played in a central attacking position; directly on top of Gerrard
- Liverpool joined the "3 at the Back" club as they attempted to get back into the game after conceding the couple of early goals
- As expected, the last half hour was almost total Liverpool possession; this can be seen through the very small size of the West Ham dots
(Click the image to open in larger window)